|
AirSoft M203 Grenade Launcher Battery UpgradeKeagan Burke of CQS has informed me of the following projects he recently did. If you would like to get more information about this project, please e-mail him directly. Images below are © Keagan Burke, and used here with written permission.
After purchasing the Tokyo Marui M4A1 carbine and using it in several outdoor skirmishes, I decided that the mini battery in the handguards just didn't last long enough for outdoor use. I needed a greater capacity, something around the limits of a large battery. But how? Much research occurred at this point. All the major discussion boards and hobby sites were searched, as well as several desperate questions posed to the AirSoftGuns.com Mailing List. In the end, it came down to just a couple choices:
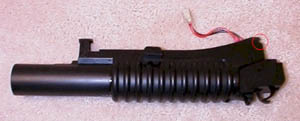
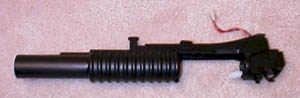
At this point, I decided I would just make do with the two batteries I had, and hope I didn't get zapped changing them in the middle of a firefight. But then, lo-and-behold, I saw several listings on The Gunrunner's Hideout Online Auction for a Korean spring Airsoft kit of an M16A1 with an M203 grenade launcher. So I ordered one from Acidman's Airsoft Guns. Needless to say, as those who have tried before me, the spring rifle was extremely disappointing. But the M203 was "killah." I believe "Acidman" will now sell just the M203, but don't quote me. I built the grenade launcher according to instruction, and it actually fired a plastic shell about 20-25 feet with some accuracy!! But I decided to scrap the internal mechanisms and use it for my battery project. The entire cost for the project was around $60 USD [maybe a couple more, I can't remember - but it was significantly less than a Sun Project M203] for the kit, $7 USD for the battery connectors, about $20 USD for the extra set of M4 handguards, and $1 USD for the splicing components. Below are some pics and descriptions to help you in making one for yourself:
What you will need:
The first step is assembling the model to get an idea of how everything fits together and how it will attach to the M4. The model goes together rather easily. Two big tips here:
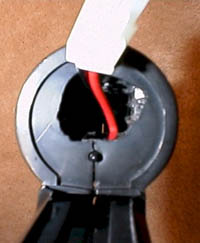
Once you've gotten the kit together, go ahead and Dremel out a large hole in the face of the receiver for the battery connector.
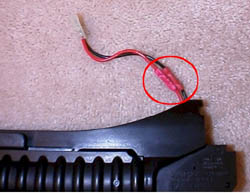
To be able to mount the M203 on the gun, you will have to alter the fuse casing. I separated the top and bottom halves, and then cut the bottom half [the one with the fuse] so that there was only the plastic "box" that protected the fuse and wires.
Electrical tape was then wrapped around each end to help secure the wires.
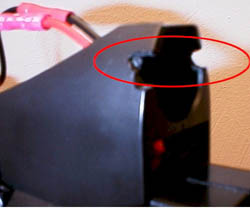
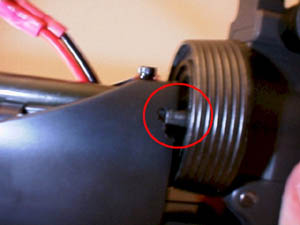
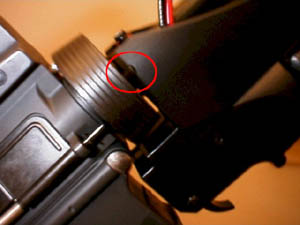
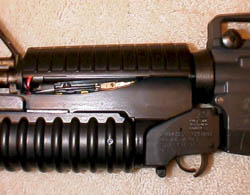
The forward mount on the kit works just fine on the barrel step down of the M4. But the rear of the M203 receiver has no way of mounting on the gun, at least on it's own. Enter the Dremel!!
The following two pics will demonstrate where on the M4 the rear of the M203 receiver mounts, and how the notches facilitate this.
Now you can drill a hole in the top of the receiver, near the butt end [end closest to the carrying handle] for the battery wires to pass through. Make sure that the hole you drill is large enough in diameter for the wires to move freely, because they will get pushed and pulled in the process of inserting and removing the battery later on. Drill the hole off to one-side of the seam between the two receiver halves. This will allow the barrel to move freely in it's track within the receiver. Now take the LARGE MALE connector and run the cut end through the hole in the top of the receiver so the plug is inside the receiver, sticking out of the much larger hole in the face of the receiver. Make absolute certain that the wires do not impede the track that the barrel will slide in [there is a rod that attaches to the barrel that guides it in this track]. If the wires interfere, then you will not be able to close the barrel on the receiver, and you will have no way of securing the battery. If this is the case, simply drill another hole, thread the wires through, and perform the same check.
Pull the cut end of the wire up through the small hole in the top of the receiver, so you have some room to work.
Next step is to assemble the battery wires. I connected the wires using, for lack of a better term, wire connectors, that I already had. These allow you to simply insert the exposed end of each wire and then crimp down on the connector [using a special tool just for the job] on each end, effectively connecting the two wires.
Make sure that the wires reach all important areas [connector on fuse box and battery]. If they don't, go back and fix them before you go on. The last step before you get to glue the receiver parts together - As you were assembling the kit, you most likely assembled it with the little tab at the bottom of the receiver [the tab that grabs the shell for extraction]. That's good, you were supposed to; but now you need to go back, take the tab out, and cut the rounded section of the tab off. This will leave you with just a square-shaped piece of plastic that will fill the slot where it is supposed to go.
Now you can glue together the parts that make up the receiver. Just be careful and don't glue anything that is supposed to move.
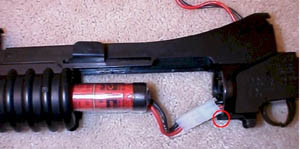
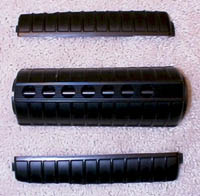
Time to work on the barrel assembly. Go ahead and glue the actual barrel parts together - do not glue the handguards onto the barrel, yet. You need to break out the Dremel yet again, and remove the two separated sections in each half of the now-assembled barrel. This will allow the large battery to slide into the barrel, and will also hold the battery in place so it won't slip and slide around when you're breaking bush.
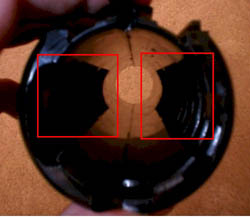
You are also going to need to line up the handguards with the barrel and note where the internal sections, that you removed in the barrel, line up on the handguards. Now take your Dremel and cut out portions of the M203 handguards that line up with those internal barrel sections. If you don't do this, the opening will be too narrow for the battery to slide into. You can make out the sections that were removed from the handguards in the picture above. Now you get to glue the handguards onto the barrel assembly.
At this point you should be able to assemble the two major parts [barrel assembly and receiver], and have an M203 that will hold a large battery. All the parts that are supposed to move freely should, and the battery wires should be able to connect the large battery to the fuse box of the gun.
Take the time to mount the M203 on your M4. If there are any problems, now is the time to catch them and make adjustments. I had to do some minor grinding work with the Dremel to get the unit to fit securely on my M4. Any problem areas should be readily apparent, as they will prevent the M203 from sitting properly.
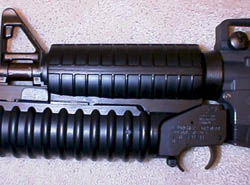
Almost there!!! Since you've checked to make sure your M203 seats properly on your M4, you can now attach it with no worries. Go ahead and do so. And put on the top M4 handguard [the one that will not fit the mini battery].
You're going to end up with a similar picture as the one above. While this is realistic, in terms of only the top handguard, the fuse box and wiring is exposed. If you're not too concerned about how it looks, you should at least be worried about the fuse and wiring being exposed to the elements and stray BB's. To protect and cover up the wires and fuse box, you're going to have to cut up the other handguard half [the one that will hold the mini battery]. I cut this particular half because the plastic was thinner because of the holes in the handguard, which meant less cutting. Plus, by having the solid handguard on top, the wires and fuse are protected even more.
Well, you're finally done. You should now have a Tokyo Marui M4 with M203 that will hold a large battery and provide you with a day's worth of juice.
I hope that this page has provided you with the information you need to make an M203 battery housing for your M4 Airsoft gun. If you have any questions regarding the process, or can think of anything that you feel should be included on this site, please feel free to email me, and let me know. |
|||||||||||||||||||||||||||||||||||||
All content © Kurtis Harris unless otherwise noted. |
||||||||||||||||||||||||||||||||||||||